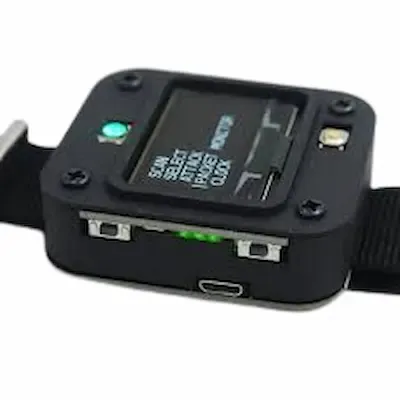
This is Paul Smith's open source smartwatch, which is completely customizable, free of data hoarders, and, best of all, open source.
While this isn't the best watch for someone looking for the most up-to-date, flashiest technology, it is an incredible project to work on if you're interested in 3d printing electronics.
The tools needed to make the watch
I also included specific programs as well as a paused Github page for the OSW where you can get even more information right now.
There are numerous ways to create your custom watch; it's similar to building a small computer; we'd start with the board type, either GPS or Light Edition, and then move on to the power supply.
The glass top and some water resistance are not available with the pre-made versions. I bought a 36-millimeter watch glass and some tpu, a rubber-like 3D printable filament, to make an inner shell like any computer.
There are many pre-designed cases to choose from, and mine is specifically for the light version with the round lipo watch glass insert and the tpu inner shell. I also purchased this 20 millimeter Watch band to match the case's specifications.
It's time to make a watch start by printing the case and anything else in my case pun intended i am using this recycled pla from 3d fuel and everyone's tpu for the inner casing
I have a bit of a problem with my tpu shell though i would advise using a nozzle size 0.2 millimeter or a resin printer but if neither is available to you add a little horizontal expansion.
So it can become printable also make sure you get at least two layers on the bottom at 0.1 millimeter of layer thickness the horizontal expansion may cause some problems as it did for me
So if you put it all together and the buttons don't press well i suggest making sure that there is no stringing or relatively low stringing and even cutting the inner inner tpu shell.
"Also read: Carbinox Watch Review "
So the buttons feel more tactile of course you don't have to make it my way is just an example do whatever you feel most comfortable the only soldering.
you really have to do is connecting the battery leads to the proper pads on the pcb that's it red to positive and black to negative
Now to make it more water resistant Paul recommends adding a blob of hot glue to isolate the connection but since i'm a lazy boy i'll just put a piece of capped on tape and call it a day.
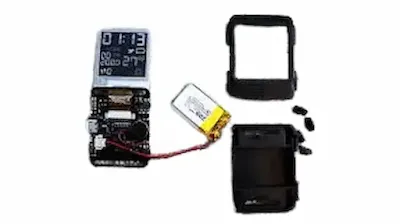
let's start assembling the case place the lipo battery in and slowly turn the main body to manage the wires gently place the side with the lcd ribbon cable into the tiny tpu pocket.
In the buttons with their proper orientations now comes the hard part remove the protective film and try to insert everything without knocking the buttons out.
If the buttons are knocked out just try it again take it out restart once you got it in there this is when you want to give the buttons a tactile test.
"Also read: TOP 5 Rugged and Waterproof Smart Watches in 2022"
If you don't feel any feedback you may have to put something in between the buttons and the tpu shell just to prefer tactility.
Once you have it to where you like it put the back plate on and secure it with the m2 screws loosely screw in all four corners. So, if all you wanted to do was create your own watch, you can stop here, but if you want to make it more personalized, I'll assist you in flashing your watch.
Now, I recommend that you read the readme thoroughly because I'm going to basically repeat what it says with visuals.
You should first install the code editor visual studio code, and then platform io and platform io ide. I also recommend installing swig c and c plus plus because that's the language we'll be using.
Some of these may be unnecessary, but it's better to be safe than sorry. I also recommend installing the ch340 or ch341 driver. The last thing we'd need to download to be able to communicate with the watch is to clone the repository for the osw.
Simply copy and paste this line into the vs code terminal, and you're almost ready to flash the watch.
First, we'll stay in vs code and navigate to include and this config.h dot example file, which I recommend duplicating so you have the original, and then we'll change one of these files to config.
So we'll have an actual file to use and changing any parameters that seem necessary, the most important being internet access if you'd like to configure your watch via web browser, but this isn't required as your watch can also act as an access point and you can still configure the watch from there.
Connect your watch to the computer and navigate to platform io, looking for the devices tab and ensuring you have something connected in the projects tab.
Open the osw folder by navigating to it. Set whatever watch you want to be the default, and since mine is the light edition, I'm going to keep this as the pico 32 light edition you have.
Then, holding the bottom left button, tap the top left button, and release the bottom left button once the screen is lit but blank, head to the arrow, and upload once you get the lines success.
Then congratulations, you have successfully flashed your watch. There are many things you can do from here, such as create a custom background.
I'm sure there are many ways to go about this, but after some assistance from discord member mpeg, we discovered that brute forcing each pixel onto the screen did the trick. Here's how to do it.
Download this image to an LCD converter and import a square image. I recommend using a photo editor to scale the image down to 240x240.
If you don't have a photo editor then you can try scaling it down where scale is 240 divided by the current image size but it's not recommended as the precision is exact.
From here navigate to options conversion and then set the preset to color r5 g6 b5 and change the size to 16 bit. We have we're supposed to have 57 600 pixels and since the last one doesn't have a comma we should then see 57 599 commas.
Now back to vs code we want to initialize a height and the width of the image then set up the progman bitmap with this line of code inside the curly brace copy and paste all 57 600 bits.
Hover over one of the bits to confirm it is recognized as auint 16 underscore t. Then collapse all this to save scrolling time and go to osw app watch phase colon colon draw watch parentheses osw hall asterix hall parentheses curly brace.
You should be able to save and flash the watch by repeating the previous steps. This is not limited to just the watch face; you can upload the image to almost anything; just keep in mind the limited storage capacity of the watch version you currently own.
Finally, I'll demonstrate how to include new apps, such as the stick game, by navigating to the source folder and the main.cpp file.
"Also read: Apple Watch Ultra impressions and review"
It's just commented out now, but when you add your own app, you'll want to include the dot h file first, then go to either the watch face switcher or the main app switcher to register the app so the watch knows what to switch to upload.
I recommend you go to Paul's Discord, where many other watchmakers have gathered to share ideas and solve each other's problems.


0 Comments